
User levels are the foundation of BricksMembers. They’re flexible access badges that control who can see what on your site.
User levels can represent anything you want. They’re not just “Free” and “Premium” membership tiers. They can be course names, download access, event tickets, or any combination you can imagine.
This guide explains how user levels work and shows you the creative ways you can use them.
What Are User Levels?
Think of user levels as access badges. Each user can have multiple badges, and each piece of content can require one or more badges to access.
Simple example:
- User 1 has badges: “Free Member” and “Course A”, user 2 only “Free Member”.
- Post requires badge: “Course A”.
- Content on the post is restricted via BricksMembers conditional logic in Bricks Builder
- Result:
- User 1 can access the post and see all content on it.
- User 2 can access the post but only sees a notice that he has to purchase “Course A” in order to see the content.
- Alternatively, you can set a redirect rule for any user level, so the users get redirected to a no-access page. But the Bricks-native variant is recommended.

The key insight: User levels are just labels. You decide what they represent and how they restrict content.
User Levels Can Be Anything
Example 1: Traditional Membership Tiers
This is the most common setup:
Levels:
- Free Member
- Pro Member
- Premium Member
How it works:
- Your payment processor (via webhooks) toggles users between these levels
- When someone upgrades from Free to Pro, they lose “Free Member” and gain “Pro Member”
- When someone downgrades, the reverse happens
Use case: Subscription-based membership site with tiered access
Example 2: Individual Courses
Levels can represent courses you sell individually:
Levels:
- DaVinci Resolve Course
- Final Cut Pro Course
- Videography Course
How it works:
- Each course is a separate product
- When someone buys “DaVinci Resolve Course,” they get that level
- They keep it forever (or until it gets removed via webhook – for example if they got a refund)
- They can buy multiple courses and have multiple levels
Use case: Online course marketplace where courses are sold separately
Example 3: Download Access
Levels can represent access to downloadable resources:
Levels:
- Photography Presets
- Videography LUTs
- Sound Effects Pack
How it works:
- These levels aren’t used for content protection
- They’re only used for download protection
- Users with “Photography Presets” level can download those files
- No posts require these levels—they’re purely for downloads
Use case: Digital product store
Example 4: Mixed Usage
Here’s where it gets powerful. You can mix all of the above:
Subscription Levels:
- Free Member
- Pro Member
- Premium Member
Individual Course Levels:
- DaVinci Resolve Course
- Final Cut Pro Course
- Videography Course
Download Levels:
- Photography Presets
- Videography LUTs
How it works:
- A user might have: “Pro Member” + “DaVinci Resolve Course” + “Photography Presets”
- The subscription (Pro Member) gives access to some content until the subscription is canceled
- The individual course (DaVinci Resolve Course) gives access to that course forever
- The download level (Photography Presets) gives access to those files forever
- BricksMembers manages the subscription levels via incoming webhooks from your payment processor (Gumroad, Paddle, Stripe, etc.)
- Individual purchases add levels without removing others (also managed by BricksMembers)
Use case: Hybrid membership + course marketplace + digital products
How User Levels Work
Multiple Levels Per User
Users can have as many levels as you want:
Example:
- User A: “Free Member”
- User B: “Pro Member” + “DaVinci Resolve Course”
- User C: “Premium Member” + “DaVinci Resolve Course” + “Final Cut Pro Course” + “Photography Presets”
There’s no limit.
OR Logic for Content Protection
When you protect a post with multiple required levels, users need at least one of them:
Example:
- Post requires: “Pro Member” OR “Premium Member”
- User with “Pro Member” can access it
- User with “Premium Member” can access it
- User with “Free Member” cannot access it
This is OR logic, not AND logic. Users don’t need all required levels—just one.
Level Assignment Dates
BricksMembers tracks when each level was assigned to each user. This is used for:
Drip content:
- “Unlock Lesson 2 seven days after user gets ‘Course A’ level”
- The system knows exactly when they got the level
Reporting:
- See when users joined each tier
- Track upgrades and downgrades
Audit trail:
- Full history of level assignments and removals
You don’t need to do anything—this happens automatically.
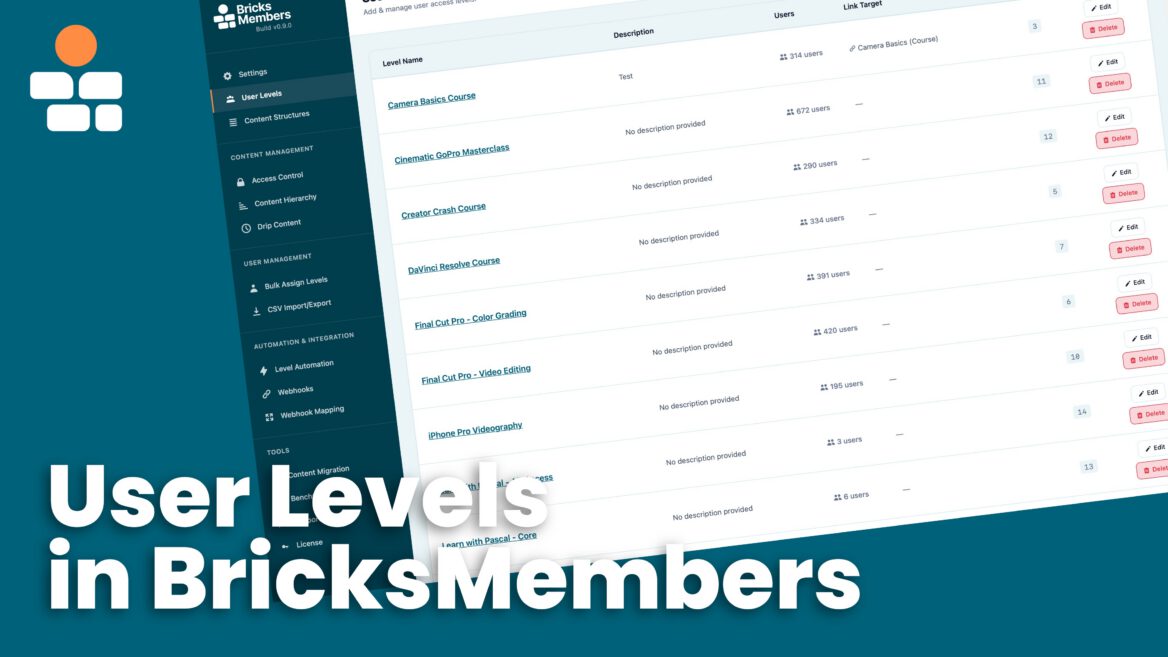
Creating User Levels
Step 1: Go to User Levels
- In WordPress admin, click BricksMembers → User Levels
- Click Add New Level
Step 2: Configure the Level
Name (required)
- The level name (e.g., “Premium Member” or “DaVinci Resolve Course”)
- This is what you’ll see in the admin and what users will see in dynamic tags
- Keep it clear and descriptive
Description (optional)
- Internal notes about this level
- Examples: “Monthly subscription tier” or “One-time purchase course”
- Only visible to admins
Link Target (optional)
- Where should this level link to when displayed with the
{brm_user:levels:link}dynamic tag? - Can be an internal page (e.g., your course overview page)
- Can be an external URL (e.g., “https://example.com/upgrade”)
- Leave blank if you don’t need links
Example use cases for Link Target:
- “Premium Member” → Links to upgrade page
- “DaVinci Resolve Course” → Links to course overview page
- “Photography Presets” → Links to download page
Step 3: Save
Click Save Level. The level is now available for assignment.
Assigning Levels to Users
Method 1: Manual Assignment (Admin)
- Go to Users → All Users
- Click Edit on a user
- Scroll to the BricksMembers section
- Check the levels you want to assign
- Click Update User
Note: This replaces all levels. If you want to add one level without removing others, make sure all desired levels are checked.
Method 2: Bulk Operations
- Go to BricksMembers → CSV Export/Import
- Update the fields to match your CSV
- Import a CSV with users
Note: Bulk operations add levels without removing existing ones.
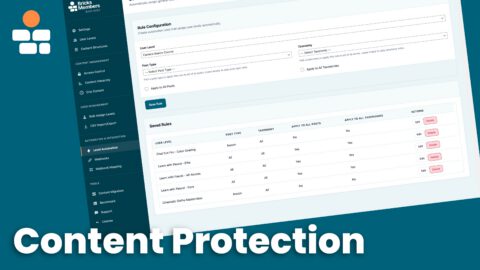
Method 3: Webhooks (Automated)
This is the recommended method for payment processors:
- Go to BricksMembers → Webhooks
- Copy your webhook URL, secret etc. to your payment provider
- Go to BricksMembers → Webhook Mapping
- Configure your payment processor (Gumroad, LemonSqueezy, Stripe, etc.) to send webhooks (use our presets in the header to save time)
- BricksMembers automatically assigns/removes levels based on purchases, subscriptions, cancellations, etc.
For subscriptions: Webhooks can toggle between levels (like remove “Free Member,” add “Pro Member”)
For one-time purchases: Webhooks add levels without removing others
See the Webhooks documentation for detailed setup instructions.
Method 4: Form Registration (Free Memberships)
For free membership sites or associations where users register without payment, you can automatically assign levels when users register via a Bricks form. This is perfect for free membership sites, associations, or any scenario where you want to grant access immediately upon registration.
How it works: When a user registers via a Bricks form, you can automatically assign one or more BRM user levels to that user. The action looks up the user by their email address and assigns the selected levels.
Setting up free level assignment:
- Create a Bricks form with an email field and any other fields you need
- In the form settings, go to the Actions section
- Add the User Registration action (this creates the WordPress user account)
- Add the Assign BRM User Levels action after the User Registration action
- In the BRM User Levels control group that appears, select one or more user levels to assign
- Save the form
Important: The “Assign BRM User Levels” action must be placed after the “User Registration” action. This ensures the user account exists before levels are assigned.
Best Practices
Use clear, descriptive names
- Good: “Premium Member,” “DaVinci Resolve Course”
- Bad: “Level 1,” “Product A”
Think about your business model first
- Subscription? Use membership tier levels
- Courses? Use course name levels
- Both? Use both types of levels
Use Link Target for important levels
- Link membership tiers to upgrade pages
- Link courses to course overview pages
- Makes dynamic tags more useful
Document your levels
- Use the Description field
- Keep notes on what each level represents
- Future you will thank you
Dynamic Tags for User Levels
You can display user levels anywhere in Bricks using dynamic tags:
Show level names:
{brm_user:levels}Output: “Premium Member, DaVinci Resolve Course”
Show level names as links:
{brm_user:levels:link}Output: Clickable links to each level’s Link Target (if configured)
Show number of levels:
{brm_user:levels_count}Output: “3”
Check if user has specific level:
{brm_user:has_level:5}Output: “1” (has level) or “0” (doesn’t have level)
See the Dynamic Tags Reference for more details.
