
Webhooks let you automatically grant or revoke user levels when users purchase products, subscribe, or cancel through external platforms like LemonSqueezy, Gumroad, Stripe, WooCommerce, and more.
This comprehensive guide covers everything you need to know: understanding webhooks, setting up your endpoint, configuring every field on the webhook mapping page, handling subscriptions, testing, and troubleshooting.
Native Integrations Available
Before setting up webhooks, check if BricksMembers has a native integration for your platform. Native integrations are simpler to configure and work instantly without external webhook setup.
Native integrations available:
- WooCommerce — If WooCommerce is on the same WordPress site, use the native WooCommerce integration instead of webhooks. Enable it in BricksMembers → Settings → Modules.
- FluentCart — If FluentCart is on the same WordPress site, use the native FluentCart integration instead of webhooks. Enable it in BricksMembers → Settings → Modules.
- FluentCRM — If FluentCRM is on the same WordPress site, use the native FluentCRM integration instead of webhooks. Enable it in BricksMembers → Settings → Modules.
- SureCart — If SureCart is on the same WordPress site, use the native SureCart integration instead of webhooks. Enable it in BricksMembers → Settings → Modules. BricksMembers registers as an official SureCart integration so you can map products to levels directly in product settings or BricksMembers → SureCart.
- SureContact — If SureContact is on the same WordPress site, use the native SureContact integration to sync level changes to tags and lists. Enable it in BricksMembers → Settings → Modules. See BricksMembers → SureContact for level-to-tag/list mapping.
- Stripe — BricksMembers has dedicated Stripe webhook support with Easy Mode, customer ID tracking, and automatic refund handling.
When to use webhooks instead of native integrations:
- The ecommerce platform is on a different site
- You need complex event-based logic not supported by native integrations
- Your platform isn’t listed above (LemonSqueezy, Gumroad, Paddle, ThriveCart, etc.)
What Are Webhooks?
A webhook is a way for external platforms to send real-time notifications to your WordPress site when something happens — like a purchase, subscription, cancellation, or upgrade.
How it works:
- Customer purchases a product on Gumroad, Stripe, LemonSqueezy, WooCommerce (or another platform)
- The provider sends a webhook (JSON data) to your BricksMembers endpoint
- BricksMembers receives the data and extracts the information using your field mappings
- User account is created (if needed) and membership level is granted based on your product mappings
- WordPress sends an email with Login details to the customer
- Customer can immediately access protected content
Why use webhooks instead of manual management or direct provider integrations?
- Instant access – Users get their membership immediately after purchase
- Zero manual work – No need to manually add users or assign levels
- Automatic updates – Subscriptions, upgrades, downgrades, and cancellations are handled automatically
- Scalable – Works perfectly whether you have 10 members or 10,000
- Reliable – No risk of forgetting to grant access or remove expired memberships
- Availability – Most payment providers support webhooks or you can use Zapier to connect them
- Compatibility – Integrating payment providers directly would be quite limiting as we’d likely only support a handful of providers, like most membership plugins do. With webhooks, you can connect pretty much every decent provider
Note: For free membership sites where users register without payment, you can use Bricks form registration with automatic level assignment instead of webhooks. This is perfect for associations, free communities, or course platforms with free tiers.
Action Triggers for On-Site Events
If your automation starts inside WordPress (form submissions, role changes, lesson completion), use the Action Triggers module instead of webhooks. It listens to WordPress action hooks and assigns levels directly—no webhook loopback needed.
- Enable Action Triggers in BricksMembers → Settings → Modules
- Go to BricksMembers → Action Triggers
- Enter the Hook Name (e.g.,
user_register) - Select the Level to Assign
- Choose Current logged-in user or User from hook arguments
- Save the trigger and test it with the actual event
Tip: Use “User from hook arguments” for background events where there is no logged-in user (e.g., bulk operations or system jobs).
Before You Begin
You’ll need:
- An account with a payment platform (LemonSqueezy, Gumroad, Stripe, etc.)
- At least one membership level created in BricksMembers
- Admin access to your WordPress site
- Products set up in your payment platform
Recommended Setup Workflow
Follow this order for the easiest setup experience:
- Get your webhook URL – Go to BricksMembers → Webhooks and copy your webhook URL (If your provider requires separate secret or API key, copy them too)
- Configure your payment platform – Add the webhook URL to your payment platform’s webhook settings
- Send a test webhook – Make a test purchase (or use your platform’s test mode) to send real webhook data
- View the webhook data – Go to BricksMembers → Webhook Mapping and check the Last Received Webhook Data sidebar on the right
- Configure field mappings – Use the actual webhook data you can see in the sidebar to configure your field mappings accurately
- Test and verify – Make another test purchase to ensure everything works correctly
Why this order? By setting up the webhook in your payment platform FIRST and sending a test webhook, you can see the exact data structure in the “Last Received Webhook Data” sidebar. This makes configuring field mappings much easier because you’re working with real data from your actual payment platform, not guessing at field paths.
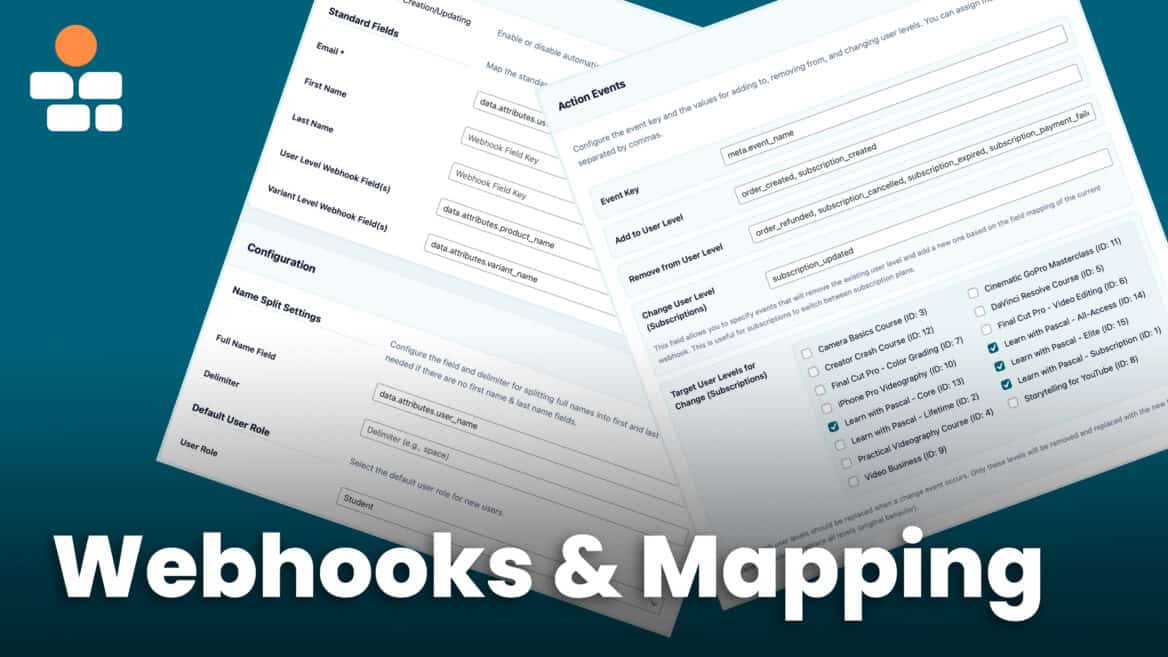
Understanding the Webhook Mapping Page
The Webhook Mapping page (BricksMembers → Webhook Mapping) is where you configure how BricksMembers reads and processes webhook data from your payment platform.
The page is organized into several sections:
- Provider Selector (in the header) – Quick auto-fill for popular platforms
- User Creation – Control whether new WordPress accounts are created automatically
- Configuration – Name splitting and default user role settings
- User Level Mapping – Map products/variants to membership levels
- Action Events – Define which events trigger which actions
- Last Received Webhook Data (sidebar) – View actual webhook data for debugging
Let’s explore each section in detail.
Quick Start: Using the Provider Selector
The fastest way to configure webhooks is to use the Provider Selector at the top of the Webhook Mapping page. This automatically fills in all the correct field mappings for popular payment platforms.
How to Use the Provider Selector
- Go to BricksMembers → Webhook Mapping
- At the top of the page, you’ll see a dropdown labeled Select provider…
- Click the dropdown and choose your payment platform:
- LemonSqueezy
- Gumroad
- ThriveCart
- Paddle
- Stripe
- WooCommerce
- PayPal
- Square
- Sellfy
- SendOwl
- FastSpring
- FluentCart
- CopeCart
- SureCart
- Click the Auto-fill Fields button
- All field mappings will be populated automatically
- Scroll down and configure your product-to-level mappings (see below)
- Click Save Settings
What gets auto-filled:
- Email field – Where to find the customer’s email in the webhook data
- First Name & Last Name fields – Where to find name data (if available)
- User Level Field – Where to find the product identifier
- Variant Level Field – Where to find the variant/price identifier (for products with multiple tiers)
- Full Name Field – For platforms that send full name instead of separate first/last
- Name Split Delimiter – How to split full names (usually a space)
- Event Key – Where to find the event type (purchase, cancellation, etc.)
- Add to User Level events – Which events grant membership
- Remove from User Level events – Which events revoke membership
- Change User Level events – Which events trigger subscription changes
Don’t see your platform? You can suggest additional providers on our roadmap page. We regularly add support for new platforms based on user requests.
Easy Mode for Stripe
When you select Stripe as your authentication method, BricksMembers activates an “Easy Mode” on the Webhook Mapping page. This mode:
- Hides advanced configuration fields that are auto-configured
- Shows only what you need: user creation toggle, default role, and Price ID mappings
- Highlights important fields in the webhook data sidebar
You can switch to “Advanced Mode” at any time if you need to customize the default field mappings.
After Auto-Fill: What You Still Need to Configure
The provider selector fills in the field paths, but you still need to map your specific products to membership levels. This is covered in detail in the “User Level Mapping” section below.
Step 1: Get Your Webhook URL
The first step is to get your BricksMembers webhook URL. You’ll need this to configure your payment platform.
Find Your Webhook URL
- Go to BricksMembers → Webhooks
- Look for the Webhook URL field at the top
- You’ll see a URL like:
https://yoursite.com/wp-json/bricksmembers/v1/webhook?secret=abc123xyz - Click the Copy button to copy it to your clipboard
Important: This URL includes a secret key (?secret=abc123xyz) for security. Keep it private—anyone with this URL can send data to your site.
Understanding Authentication Methods
BricksMembers supports multiple authentication methods for securing webhook requests. Choose the one that matches your payment provider:
Stripe Authentication (Recommended for Stripe)
- What it is: Native Stripe webhook signature verification using the
Stripe-Signatureheader - How it works: Stripe signs each webhook with a timestamp and signature. BricksMembers verifies this using Stripe’s signing secret (
whsec_...) - Required fields: Webhook Signing Secret (copy from Stripe’s webhook endpoint settings)
- Special features: Customer ID tracking, Easy Mode UI, automatic refund handling, webhook queuing
PayPal Authentication (Recommended for PayPal)
- What it is: Native PayPal webhook signature verification using certificate-based validation
- How it works: PayPal sends headers with certificate info that BricksMembers uses to verify the webhook authenticity
- Required fields: PayPal Webhook ID (found in your PayPal Developer Dashboard after creating the webhook)
Query Parameter Authentication (Default)
- What it is: Simple secret-in-URL authentication
- How it works: The webhook URL contains
?secret=...and any request with the correct secret is accepted - When to use: General-purpose authentication for most platforms (LemonSqueezy, Gumroad, ThriveCart, etc.)
HMAC Signature Authentication
- What it is: Hash-based message authentication
- How it works: The provider signs the webhook payload with a secret; BricksMembers verifies the signature
- When to use: For platforms like Paddle that use generic HMAC signing
API Key Authentication
- What it is: Bearer token authentication via HTTP header
- How it works: The provider sends
Authorization: Bearer {api_key}in the header - When to use: For platforms that support custom headers and you want extra security
Recommendation: If you’re using Stripe or PayPal, choose their dedicated authentication methods for the best experience. For other platforms, Query Parameter authentication works well.
URL Parameter Mode
Some payment providers (like SimpleShop) send webhook data as URL query parameters instead of a JSON body. BricksMembers supports this via URL Parameter Mode.
To enable URL Parameter Mode:
- Go to BricksMembers → Webhooks
- Enable the URL Parameter Mode toggle
- Click Save Settings
What URL Parameter Mode does:
- Accepts GET requests — In addition to POST, the webhook endpoint will accept GET requests
- Extracts data from URL parameters — Any query parameters in the webhook URL are captured and available for field mapping
- Skips JSON validation — The Content-Type check is bypassed, allowing non-JSON requests
- Auto-grants levels — If no event actions are matched but valid levels are resolved, the level is automatically added (perfect for simple “purchase = grant access” workflows)
- Level expiration support — Lets levels expire after a set time for time-limited access
Regenerate Your Webhook URL (If Needed)
If you suspect your webhook URL has been compromised, you can generate a new one:
- Go to BricksMembers → Webhooks
- Click Regenerate Webhook URL
- Copy the new URL
- Update the webhook URL in your payment platform
Note: The old URL will stop working immediately after regeneration.
Step 2: Configure Your Payment Platform
Now that you have your webhook URL, add it to your payment platform. Each platform has a different interface for setting up webhooks. Here are step-by-step instructions for the most common platforms:
LemonSqueezy
- Log in to your LemonSqueezy dashboard
- Go to Settings → Webhooks
- Click + Create Webhook
- Paste your BricksMembers webhook URL
- Select these events:
order_createdsubscription_createdsubscription_updatedsubscription_cancelledsubscription_expiredorder_refunded
- Click Save
Gumroad
- Log in to your Gumroad dashboard
- Go to Settings → Advanced → Webhooks
- Paste your BricksMembers webhook URL
- Select Sale, Refund, and Cancellation events
- Click Save
Stripe
BricksMembers has dedicated Stripe support! For the best experience, we recommend using the built-in Stripe authentication method instead of generic webhook authentication. See the Complete Stripe Integration Guide for step-by-step instructions.
Quick setup:
- Go to BricksMembers → Webhooks and select Stripe as the provider
- Log in to your Stripe Dashboard
- Go to Developers → Webhooks
- Click Add endpoint or Create an event destination (label varies by Stripe account; newer accounts may show “Create an event destination”)
- Paste your BricksMembers webhook URL
- Select these events:
checkout.session.completedinvoice.payment_succeededcustomer.subscription.createdcustomer.subscription.updatedcustomer.subscription.deletedinvoice.payment_failedcharge.refunded
- Click Add endpoint
- Copy the Signing secret (starts with
whsec_) and paste it into BricksMembers
Benefits of using Stripe authentication:
- Automatic signature verification using Stripe’s official method
- Customer ID tracking across all webhooks
- Easy Mode UI for simplified configuration
- Automatic refund handling for one-time purchases
- Webhook queuing for race condition handling
Paddle
- Log in to your Paddle dashboard
- Go to Developer Tools → Webhooks
- Click Add Webhook
- Paste your BricksMembers webhook URL
- Select relevant events (subscription created, updated, cancelled, payment succeeded, payment failed)
- Click Save
ThriveCart
- Log in to your ThriveCart dashboard
- Go to Settings → Integrations
- Find the Webhooks section
- Paste your BricksMembers webhook URL
- Select purchase, refund, and subscription events
- Click Save
PayPal
BricksMembers has dedicated PayPal support! For the best experience, use the built-in PayPal authentication method:
- Go to BricksMembers → Webhooks and select PayPal as the provider
- Log in to your PayPal Developer Dashboard
- Go to Apps & Credentials
- Select your app (or create one)
- Scroll to Webhooks and click Add Webhook
- Paste your BricksMembers webhook URL
- Select events:
PAYMENT.SALE.COMPLETEDPAYMENT.SALE.REFUNDEDBILLING.SUBSCRIPTION.CREATEDBILLING.SUBSCRIPTION.ACTIVATEDBILLING.SUBSCRIPTION.CANCELLEDBILLING.SUBSCRIPTION.SUSPENDED
- After saving, copy the Webhook ID and paste it into BricksMembers
WooCommerce
WooCommerce has native webhook support built-in. To set up:
- Go to WooCommerce → Settings → Advanced → Webhooks
- Click Add webhook and configure:
- Name: BricksMembers IntegrationStatus: ActiveTopic: Order updated (or Subscription updated)Delivery URL: Your BricksMembers webhook URLSecret: Your BricksMembers webhook secret
- Click Save webhook
Managing Access (Grant and Remove Levels)
When you autofill the WooCommerce provider, the Event Key is set to status. This allows BricksMembers to automatically grant or remove user levels based on order and subscription status changes.
Default configuration:
- Add to User Level:
completed, processing, active - Remove from User Level:
cancelled, refunded, failed, expired, on-hold, trash
This configuration works for both one-time products and subscriptions. When an order is marked “completed”, the user gets the level. When refunded or cancelled, the level is removed.
Status Reference
Order statuses: pending (no action), processing (grant access), completed (grant access), cancelled (remove), refunded (remove), failed (remove)
Subscription statuses: active (grant access), cancelled (remove), expired (remove), on-hold (remove), trash (remove)
You can customize these trigger values in the Event Configuration section based on your specific needs.
Step 3: Send a Test Webhook
Before configuring field mappings, send a test webhook so you can see the actual data structure from your payment platform.
Option 1: Use Your Platform’s Test Mode
Most payment platforms have a test/sandbox mode:
- Enable test mode in your payment platform
- Make a test purchase using test credit card numbers (provided by your platform)
- The platform will send a webhook to your BricksMembers endpoint
Option 2: Use Your Platform’s Webhook Testing Tool
Some platforms (like Stripe and LemonSqueezy) let you send test webhooks directly from their dashboard:
- Go to your platform’s webhook settings
- Look for “Send test webhook” or “Test endpoint” button
- Select an event type (e.g., “order_created” or “subscription_created”)
- Click send
Verify the Webhook Was Received
- Go to BricksMembers → Webhook Mapping
- Look at the Last Received Webhook Data sidebar on the right side of the page
- You should see the JSON data from your test webhook
This is crucial! Having the actual webhook data visible in the sidebar makes the next steps much easier. You’ll be able to see exactly where each piece of data is located and copy the correct field paths.
Step 4: Configure Field Mappings
Now that you can see the actual webhook data in the sidebar, you’re ready to configure field mappings. This tells BricksMembers where to find specific data in the webhook payload.
Understanding Dot Notation
Webhooks send data in JSON format, which can have nested structures. BricksMembers uses dot notation to navigate through these nested levels.
Example webhook payload from LemonSqueezy:
{
  "meta": {
    "event_name": "order_created"
  },
  "data": {
    "attributes": {
      "user_email": "john@example.com",
      "user_name": "John Doe",
      "product_name": "Premium Course",
      "variant_name": "Monthly Plan"
    }
  }
}
To access the email: data.attributes.user_email
To access the product name: data.attributes.product_name
To access the event type: meta.event_name
Each dot (.) represents going one level deeper into the data structure.
How to Find the Correct Field Paths
Now that you have webhook data in the sidebar, here’s how to configure your field mappings:
Method 1: Use the Provider Selector (Fastest)
- If your platform is supported, use the provider selector at the top of the page
- Click “Auto-fill Fields” and all paths will be populated automatically
- Skip to the “User Level Mapping” section below
Method 2: Use the Sidebar Data (Manual but Accurate)
- Look at the Last Received Webhook Data sidebar on the right
- Find the email address in the JSON structure
- Copy the path to it (e.g.
data.attributes.user_email) - Enter that path in the Email field
- Repeat for other fields (product name, variant name, event type, etc.)
Pro Tip: Keep the sidebar visible while configuring fields. You can scroll down the page while referring to the sidebar data to ensure you’re entering the correct paths.
Section 1: User Creation
This section controls whether BricksMembers automatically creates WordPress user accounts when webhooks are received.
Enable User Creation/Updating
Checkbox: Enable User Creation/Updating
What it does:
- Checked: BricksMembers will create new WordPress accounts for customers who don’t have one, and update existing accounts
- Unchecked: BricksMembers will only update existing users. If a webhook arrives for an email that doesn’t exist, it will be rejected
When to enable: Enable this if you’re selling to new customers who don’t already have WordPress accounts on your site.
When to disable: Disable this if you only want to grant levels to existing users (e.g., you manually create accounts first).
Standard Fields
These fields tell BricksMembers where to find basic user information in the webhook payload.
Email * (Required)
- What it is: The path to the customer’s email address in the webhook data
- Why it’s required: Email is used to find or create the WordPress user account
- Example:
data.attributes.user_email(LemonSqueezy)
First Name
- What it is: The path to the customer’s first name
- Optional: Leave blank if your platform doesn’t send separate first/last names
- Example:
data.attributes.first_name
Last Name
- What it is: The path to the customer’s last name
- Optional: Leave blank if your platform doesn’t send separate first/last names
- Example:
data.attributes.last_name
User Level Webhook Field(s)
- What it is: The path to the product identifier (product ID, product name, SKU, etc.)
- How it works: BricksMembers reads this value and matches it against your product mappings (see “User Level Mapping” section below)
- Example:
data.attributes.product_name(LemonSqueezy uses product names) - Example:
data.object.items.data.0.product.name(Stripe uses nested product data)
Variant Level Webhook Field(s)
- What it is: The path to the variant/price identifier (for products with multiple tiers or pricing options)
- When to use: Use this when you have one product with multiple variants (e.g., “Course” with “Monthly” and “Annual” variants)
- How it works: When a variant is set for a level, both the product value and the variant value must match the webhook payload. If no variant is set, only the product value must match.
- Example:
data.attributes.variant_name(LemonSqueezy) - Example:
data.object.items.data.0.price.nickname(Stripe)
Understanding Product vs Variant Fields
This is a common point of confusion, so let’s clarify:
Use Product Field when:
- You have separate products for each membership level (e.g., “Basic Course” and “Premium Course” are two different products)
- Each product grants a different membership level
Use Variant Field when:
- You have one product with multiple pricing options (e.g., “Course” with “Monthly $29” and “Annual $199” variants)
- Different variants grant different membership levels or durations, and the product name/ID also needs to match
Use Both when:
- You have multiple products, and some of them have variants (variant matches still require the product to match)
- Leave the variant blank for levels that should match on product only; add a variant for levels that need both to match.
Section 2: Configuration
This section contains settings for name handling and default user roles.
Name Split Settings
Some payment platforms send the customer’s full name in a single field instead of separate first and last name fields. BricksMembers can automatically split these for you.
Full Name Field
- What it is: The path to the field containing the full name
- When to use: Only use this if your platform doesn’t send separate first/last name fields
- Example:
data.attributes.user_name(LemonSqueezy sends “John Wick” in this field) - Leave blank if: You’re using the First Name and Last Name fields above
Delimiter
- What it is: The character(s) used to split the full name
- Default: A single space (
- How it works: If the full name is “John Wick”, BricksMembers splits it at the space: First Name = “John”, Last Name = “Wick”
- Other examples: Some platforms use commas (“John, Wick”) or other delimiters
Important: If you configure both the First Name/Last Name fields AND the Full Name field, the First Name/Last Name fields take priority. The Full Name field is only used as a fallback.
Default User Role
User Role
- What it is: The WordPress role assigned to new users created via webhooks
- Default: Subscriber
- Options: Any WordPress role (Subscriber, Contributor, Author, Editor, Administrator, or custom roles)
- Recommendation: Keep this as “Subscriber” for security. Membership levels control access, not WordPress roles.
- Create Your own: On BricksMembers → Settings → General → Manage User Roles, you can create your own WP user roles like “Student” to differentiate members even more
Note: By default, this only affects NEW users created via webhooks. You can change this behavior using the Advanced Role Updates toggle below.
Advanced Role Updates
- Update role for existing users on webhook: When enabled, existing users will be updated to the selected default role when a webhook matches them (enabled by default).
- Reset role when all levels are removed: When enabled, the user’s WordPress role is changed to your chosen fallback role once their last membership level is removed (disabled by default).
- Fallback role when empty: The role to assign after all membership levels are removed (defaults to Subscriber).
Section 3: User Level Mapping
This is where you map your payment platform’s products and variants to BricksMembers membership levels. This tells BricksMembers which membership level to grant when a specific product or variant is purchased.
How Product/Variant Mapping Works
For each membership level you’ve created in BricksMembers, you can specify:
- Product Name: The exact product identifier from your payment platform
- Variant Name: The exact variant identifier (optional)
When a webhook arrives, BricksMembers:
- Extracts the product value using the “User Level Webhook Field” path you configured
- Extracts the variant value using the “Variant Level Webhook Field” path (if configured)
- For levels with a Variant set: BOTH the product value and the variant value must match the webhook payload
- For levels without a Variant set: Only the product value must match
- Grants the corresponding membership level(s)
Configuring Product/Variant Mappings
For each membership level, you’ll see two input fields:
Product Name (optional)
- What to enter: The exact product identifier from your payment platform
- Case-insensitive: “Premium Course” matches “premium course” and “PREMIUM COURSE”
- Examples:
- LemonSqueezy: “Premium Membership” (the product name)
- Gumroad: “premium-course” (the product permalink)
- Stripe: “Premium Course” (the product name)
Variant Name (optional)
- What to enter: The exact variant identifier from your payment platform
- Case-insensitive: “Monthly Plan” matches “monthly plan”
- Examples:
- LemonSqueezy: “Monthly” (the variant name)
- Stripe: “Monthly Plan” (the price nickname)
Example Configurations
Example 1: Separate Products for Each Level
- Basic Member level:
- Product Name:
Basic Course - Variant Name: (leave blank)
- Product Name:
- Premium Member level:
- Product Name:
Premium Course - Variant Name: (leave blank)
- Product Name:
Example 2: One Product with Multiple Variants
- Monthly Member level:
- Product Name: (leave blank or use
Course Access) - Variant Name:
Monthly Plan
- Product Name: (leave blank or use
- Annual Member level:
- Product Name: (leave blank or use
Course Access) - Variant Name:
Annual Plan
- Product Name: (leave blank or use
Example 3: Mixed (Products + Variants)
- Basic Member level:
- Product Name:
Basic Course - Variant Name: (leave blank)
- Product Name:
- Pro Monthly level:
- Product Name:
Pro Course - Variant Name:
Monthly
- Product Name:
- Pro Annual level:
- Product Name:
Pro Course - Variant Name:
Annual
- Product Name:
Finding Your Product/Variant Identifiers
The easiest way to find the exact product/variant identifiers is to:
- Make a test purchase (or use your platform’s test mode)
- Go to BricksMembers → Webhook Mapping
- Look at the Last Received Webhook Data sidebar
- Find the product and variant values in the data structure – can be product names or IDs
- Copy those exact values into your mappings
Section 4: Action Events
This section defines which webhook events trigger which actions. This is crucial for handling purchases, subscriptions, cancellations, and upgrades/downgrades correctly.
Event Key
What it is: The path to the field that contains the event type in the webhook payload.
Examples:
- LemonSqueezy:
meta.event_name - Stripe:
type - Gumroad:
type
How it works: BricksMembers reads this field to determine what action to take (add level, remove level, or change level).
Add to User Level
What it is: A comma-separated list of event values that should GRANT membership levels.
When to use: Events that represent successful purchases or subscription starts.
How it works: When a webhook arrives with one of these event values, BricksMembers ADDS the mapped membership level to the user (without removing existing levels).
Examples:
- LemonSqueezy:
order_created, subscription_created - Stripe:
invoice.payment_succeeded, customer.subscription.created - Gumroad:
sale
Note for Stripe: The checkout.session.completed event is used internally to link Stripe customer IDs but doesn’t directly grant levels (since it often lacks product/price data). Level assignment happens via invoice.payment_succeeded.
Remove from User Level
What it is: A comma-separated list of event values that should REVOKE membership levels.
When to use: Events that represent cancellations, expirations, refunds, or payment failures.
How it works: When a webhook arrives with one of these event values, BricksMembers REMOVES the mapped membership level from the user (other levels remain unchanged).
Examples:
- LemonSqueezy:
order_refunded, subscription_cancelled, subscription_expired, subscription_payment_failed - Stripe:
customer.subscription.deleted, invoice.payment_failed, charge.refunded - Gumroad:
refund, cancellation
Note for Stripe refunds: The charge.refunded event is used for one-time purchases. BricksMembers tracks which level was granted for each charge and removes it when refunded. For subscriptions, customer.subscription.deleted handles level removal.
Change User Level (Subscriptions)
What it is: A comma-separated list of event values that should REPLACE membership levels (used for subscription plan changes).
When to use: Events that represent subscription upgrades, downgrades, or plan changes.
How it works: This is different from “Add” and “Remove” because it’s designed for subscription changes:
- BricksMembers removes the user’s existing subscription-related levels (see “Target User Levels” below)
- BricksMembers adds the new level based on the product/variant mapping in the webhook
Examples:
- LemonSqueezy:
subscription_updated - Stripe:
customer.subscription.updated
Real-world example: User has “Monthly Member” level and upgrades to “Annual Member”. The webhook event is subscription_updated. BricksMembers removes “Monthly Member” and adds “Annual Member”.
Target User Levels for Change (Subscriptions)
What it is: Checkboxes to select which membership levels should be removed when a “Change User Level” event occurs.
Why this exists: This gives you precise control over subscription changes. You might have some levels that should be removed during plan changes (subscription levels) and others that should remain (lifetime access levels, bonus levels, etc.).
How it works:
- If you select specific levels: Only those levels will be removed during a change event. Other levels remain untouched.
- If you leave all unchecked: ALL levels will be removed during a change event (original behavior).
Example configuration:
- Your membership levels:
- Monthly Member (subscription)
- Annual Member (subscription)
- Lifetime Member (one-time purchase)
- Bonus Access (manually granted)
- Target levels for change: Check “Monthly Member” and “Annual Member”
- Result: When a subscription changes, only subscription levels are removed/changed. Lifetime and Bonus levels remain.
Understanding the Difference: Add vs Remove vs Change
This is the most important concept to understand for proper webhook configuration:
“Add to User Level” (Additive)
- Adds the new level WITHOUT removing existing levels
- Use for: One-time purchases, new subscriptions, granting additional access
- Example: User buys “Course A” → Gets “Course A Access” level (keeps all other levels)
“Remove from User Level” (Subtractive)
- Removes the specified level WITHOUT affecting other levels
- Use for: Cancellations, expirations, refunds
- Example: User cancels subscription → Loses “Premium Member” level (keeps other levels)
“Change User Level” (Replacement)
- Removes target levels AND adds the new level
- Use for: Subscription plan changes, upgrades, downgrades
- Example: User upgrades from Monthly to Annual → Loses “Monthly Member”, gains “Annual Member”
Testing Your Webhook Configuration
Before going live, always test your webhook configuration to ensure everything works correctly.
Method 1: Using the Built-in Test Tool
BricksMembers includes a test tool on the Webhooks page:
- Go to BricksMembers → Webhooks
- Scroll to Test Webhook
- Add test data fields:
- Click Add Field
- Enter the field path (e.g.,
data.attributes.user_email) - Enter a test value (e.g.,
test@example.com) - Repeat for all required fields (email, product name, event type, etc.)
- Click Send Test Webhook
- Check the response to see if it succeeded
- Verify the user was created/updated with the correct level
Method 2: Using Your Payment Platform’s Test Mode
Most payment platforms have a test/sandbox mode where you can make test purchases without real money:
- Enable test mode in your payment platform
- Make a test purchase using test credit card numbers (provided by your platform)
- Go to BricksMembers → Webhook Mapping
- Check the Last Received Webhook Data sidebar to see if the webhook arrived
- Go to Users in WordPress and verify:
- The user was created (if user creation is enabled)
- The correct membership level was granted
- Test different scenarios:
- New purchase (should add level)
- Cancellation (should remove level)
- Upgrade/downgrade (should change level)
Viewing Webhook Data
The Last Received Webhook Data sidebar on the Webhook Mapping page is your best debugging tool:
- What it shows: The exact JSON structure of the last webhook received
- How to use it: Compare the field paths in your configuration to the actual data structure
- When it updates: Every time a new webhook is received
Enable Webhook Logging
Webhook logging helps you debug issues by storing webhook data and optionally writing detailed logs.
To enable logging:
- Go to BricksMembers → Webhooks
- Enable Enable Logging
- Click Save Settings
What logging does:
- Always: Stores the last received webhook data in the database (visible in the “Last Received Webhook Data” sidebar on the Webhook Mapping page)
- If WP_DEBUG_LOG is enabled: Also writes detailed request/response logs to
wp-content/debug.logincluding:- Incoming request details (IP, headers, body)
- Response status and data
- Processing time
- Sensitive data (Authorization headers, secrets) are automatically redacted
Note: To enable debug logging to the file, you must add this to your wp-config.php:
define('WP_DEBUG_LOG', true);Without this, logging will only store the last webhook data in the sidebar, not write to the debug.log file.
Security & Rate Limiting
BricksMembers webhooks include multiple security layers to protect your site:
Security Features
- Secret key authentication – The webhook URL includes a secret parameter that must match
- Bearer token support – Optional API key in Authorization header for additional security
- Content-type validation – Only accepts
application/jsonrequests - Data sanitization – All incoming data is sanitized before processing
- Rate limiting – Prevents abuse and spam (see below)
- HTTPS recommended – Use HTTPS in production to encrypt data in transit
Rate Limiting
BricksMembers includes built-in rate limiting to prevent abuse:
- Limit: 60 requests per minute per IP address
- Response when exceeded: HTTP 429 (Too Many Requests)
- Reset time: 60 seconds
- Purpose: Protects your site from malicious webhook spam while allowing legitimate high-volume usage
If you’re hitting the rate limit during normal operation, this usually indicates a configuration issue (e.g., webhook loops or duplicate webhooks from your platform).
Troubleshooting Common Issues
Webhook Not Received
Symptoms: Payment platform shows webhook sent, but nothing happens in BricksMembers.
Solutions:
- Check that the webhook URL is correct in your payment platform
- Verify the secret key is included in the URL
- Enable webhook logging in BricksMembers to see if requests are arriving
- Check your server’s firewall settings – ensure it allows incoming POST requests
- Verify your SSL certificate is valid (if using HTTPS)
- Check WordPress debug logs for errors
User Not Created
Symptoms: Webhook is received, but no user account is created.
Solutions:
- Verify Enable automatic user creation is checked
- Check that the email field mapping is correct
- Look at the webhook logs to see the exact error message
- Verify the email address is valid
- Check if a user with that email already exists
Membership Level Not Granted
Symptoms: User is created, but doesn’t have the correct membership level.
Solutions:
- Check the product-to-level mapping is configured correctly
- Verify the product name or ID in the webhook matches your mapping
- Check if you’re using the correct field (product name or ID vs variant name or ID)
- Look at the webhook logs to see if the correct product name or ID was received
- Verify the membership level exists in BricksMembers
Field Mapping Not Working
Symptoms: Data is not being extracted correctly from the webhook (wrong email, wrong product, etc.).
Solutions:
- Go to BricksMembers → Webhook Mapping
- Check the Last Received Webhook Data sidebar
- Compare your field paths to the actual data structure:
- Is the path correct? (e.g.,
data.attributes.user_emailvsdata.user_email) - Are there typos? (paths are case-sensitive)
- Does the field exist in the webhook data?
- Is the path correct? (e.g.,
- Try using the provider selector auto-fill feature
- Test with a simple webhook first to verify the endpoint works
Wrong Membership Level Granted
Symptoms: User gets the wrong membership level or no level at all.
Solutions:
- Check the Last Received Webhook Data sidebar
- Find the product/variant value in the webhook data
- Go to the User Level Mapping section
- Verify your product/variant mappings match EXACTLY (case-insensitive, but must match the value)
- Common issues:
- Using product ID when the webhook sends product name
- Using variant field when the product doesn’t have variants
- Typos in product/variant names
Subscription Changes Not Working
Symptoms: When a user upgrades/downgrades, they get both levels or keep the old level.
Solutions:
- Go to Action Events section
- Verify the Change User Level field includes the correct event (e.g.,
subscription_updated) - Check the Target User Levels for Change checkboxes:
- If you want to remove ALL levels: Leave all unchecked
- If you want to remove only subscription levels: Check only subscription levels
- Make sure the event value in the webhook matches your configuration
HTTP 415 Error (Invalid Content Type)
Symptoms: Payment platform shows HTTP 415 error.
Solution: Ensure your payment platform is sending webhooks with Content-Type: application/json header. Most platforms do this by default, but some require configuration.
HTTP 429 Error (Too Many Requests)
Symptoms: Webhooks fail with HTTP 429 error.
Solution: You’re hitting the rate limit (60 requests per minute). This usually indicates:
- Your payment platform is sending duplicate webhooks
- You’re testing too rapidly
- There’s a misconfiguration causing webhook loops
Wait 60 seconds for the rate limit to reset, then investigate the root cause.
Best Practices
1. Always Test in Staging First
Set up and test your webhooks on a staging site before deploying to production. This prevents issues with real customer purchases.
2. Enable Logging During Setup
Keep webhook logging enabled while you’re setting up and testing. You can disable it later once everything works correctly.
3. Use HTTPS in Production
Always use HTTPS for your webhook endpoint in production. This encrypts the data in transit and prevents interception.
4. Keep Your Secret Key Private
Never share your webhook URL publicly or commit it to version control. If it’s compromised, regenerate it immediately.
5. Use the Provider Selector
If your platform is supported, always use the provider selector auto-fill feature.
6. Request New Providers
Don’t see your payment platform in the provider selector? You can suggest it on our roadmap page. We regularly add support for new platforms based on user requests. The more requests we get for a specific platform, the higher priority it becomes.
Real-World Examples
Example 1: Simple Course Access
Scenario: You sell a single course for $99 on LemonSqueezy.
Setup:
- Membership Level: “Course Member”
- Product ID:
12345 - Field Mapping: Auto-fill for LemonSqueezy
- Product Mapping:
12345→ Course Member - Event Actions:
order_created→ Add to User Level
Result: When someone purchases the course, they immediately get access to all course content.
Example 2: Tiered Membership with Stripe
Scenario: You offer three membership tiers on Stripe.
Setup (using Easy Mode):
- Authentication: Set to Stripe in BricksMembers → Webhooks
- Membership Levels:
- Basic Member
- Pro Member
- Premium Member
- Price ID Mappings:
price_1ABC123...→ Basic Memberprice_1DEF456...→ Pro Memberprice_1GHI789...→ Premium Member
- Subscription Level Changes: Check all three levels
Result: With Stripe authentication enabled, BricksMembers uses Easy Mode which auto-configures all events. Users get the correct tier based on their subscription, and levels are automatically updated when they upgrade, downgrade, or cancel. Refunds are also handled automatically.
Example 3: Product Bundle
Scenario: You sell individual courses and a bundle that includes all courses.
Setup:
- Membership Levels:
- Course A
- Course B
- Course C
- All Access Pass
- Product Mappings:
CourseA → Course ACourse B→ Course BCourseC→ Course CAll Access Pass→ All Access Pass
- Content Protection:
- Course A posts require: Course A Access OR All Access Pass
- Course B posts require: Course B Access OR All Access Pass
- Course C posts require: Course C Access OR All Access Pass
Result: Users can purchase individual courses or the bundle, and the All Access Pass grants access to everything.
Technical Reference
Webhook Endpoint
POST https://yoursite.com/wp-json/bricksmembers/v1/webhook?secret=YOUR_SECRETRequired Headers
Content-Type: application/json
Authorization: Bearer YOUR_API_KEY (optional)
Response Codes
200– Success400– Bad Request (invalid data)403– Forbidden/Unauthorized (authentication failed)415– Unsupported Media Type (not JSON)429– Too Many Requests (rate limit exceeded)500– Internal Server Error
Success Response Example
{
  "success": true,
  "message": "Webhook processed",
  "data": {
    "user_id": 123,
    "event": "subscription_updated",
    "resolved_levels": [3],
    "action": "change"
  }
}
Error Response Example
{
  "success": false,
  "message": "User not found and user creation is disabled"
}
Key Takeaways
- Provider Selector saves time – use it if your platform is supported
- Dot notation is how you navigate nested webhook data
- Product vs Variant – understand the difference for proper mapping
- Add vs Remove vs Change – each serves a different purpose for membership management
- Target Levels – gives you precise control over subscription changes
- Test thoroughly – always test before going live
- Use the sidebar – “Last Received Webhook Data” is your best debugging tool
With webhooks properly configured, your membership site runs on autopilot — granting access instantly, handling subscription changes automatically, and removing access when needed. No manual work required!

