
Your site’s navigation should adapt to each visitor. Show “Login” to guests, “Dashboard” to members, and “VIP Resources” only to VIP members. BricksMembers’ Menu Visibility Control makes this easy with no code required.
What you’ll learn:
- How menu visibility control works
- Enabling the menu visibility module
- Setting visibility rules for menu items
- Creating member-specific navigation
- Best practices for menu organization
- Common patterns and use cases
- Troubleshooting visibility issues
Prerequisites:
- BricksMembers installed and activated
- At least one user level created
- A WordPress menu created (Appearance → Menus)
Part 1: Understanding Menu Visibility
The Problem
By default, WordPress shows the same menu to everyone. This creates a poor user experience:
For logged-out visitors:
- They see “My Account” and “Dashboard” links that don’t work
- They see “Premium Resources” they can’t access
- They don’t see “Login” or “Sign Up” links
For logged-in members:
- They see “Login” and “Sign Up” links they don’t need
- They see content links for levels they don’t have
- They don’t see level-specific resources
The Solution
BricksMembers Menu Visibility Control lets you set rules for each menu item:
- Always Show (Default) – Everyone sees it
- Show if Logged In – Only logged-in users see it
- Show if Logged Out – Only guests see it
- Show if User Has Level(s) – Only users with specific levels see it
- Hide if User Has Level(s) – Hide from users with specific levels
Result: Each visitor sees a personalized menu tailored to their access level.
Part 2: Enabling Menu Visibility
Step 1: Enable the Module
- Go to BricksMembers → Settings → Modules
- Find Menu Visibility Control
- Toggle it ON
- Click Save Settings
Result: Menu visibility controls are now available in the WordPress menu editor.
Step 2: Verify It’s Working
- Go to Appearance → Menus
- Click on any menu item to expand it
- You should see a new section: Visibility (BricksMembers)
If you don’t see it, refresh the page or clear your browser cache.
Part 3: Setting Visibility Rules
Let’s configure visibility for different menu items.
Rule 1: Always Show (Default)
Use case: Public pages everyone should see (legal etc.).
Steps:
- Go to Appearance → Menus
- Expand a menu item (e.g., “Privacy Notice”)
- In the Visibility (BricksMembers) section:
- Visibility: Always Show (Default)
- Click Save Menu
Result: This menu item appears for everyone (logged in or out).
Rule 2: Show if Logged In
Use case: Member-only pages (Dashboard, My Account, Profile).
Steps:
- Expand the menu item (e.g., “Dashboard”)
- In the Visibility (BricksMembers) section:
- Visibility: Show if Logged In
- Click Save Menu
Result: Only logged-in users see this menu item.
Rule 3: Show if Logged Out
Use case: Authentication pages (Login, Sign Up, Forgot Password).
Steps:
- Expand the menu item (e.g., “Login”)
- In the Visibility (BricksMembers) section:
- Visibility: Show if Logged Out
- Click Save Menu
Result: Only logged-out visitors see this menu item.
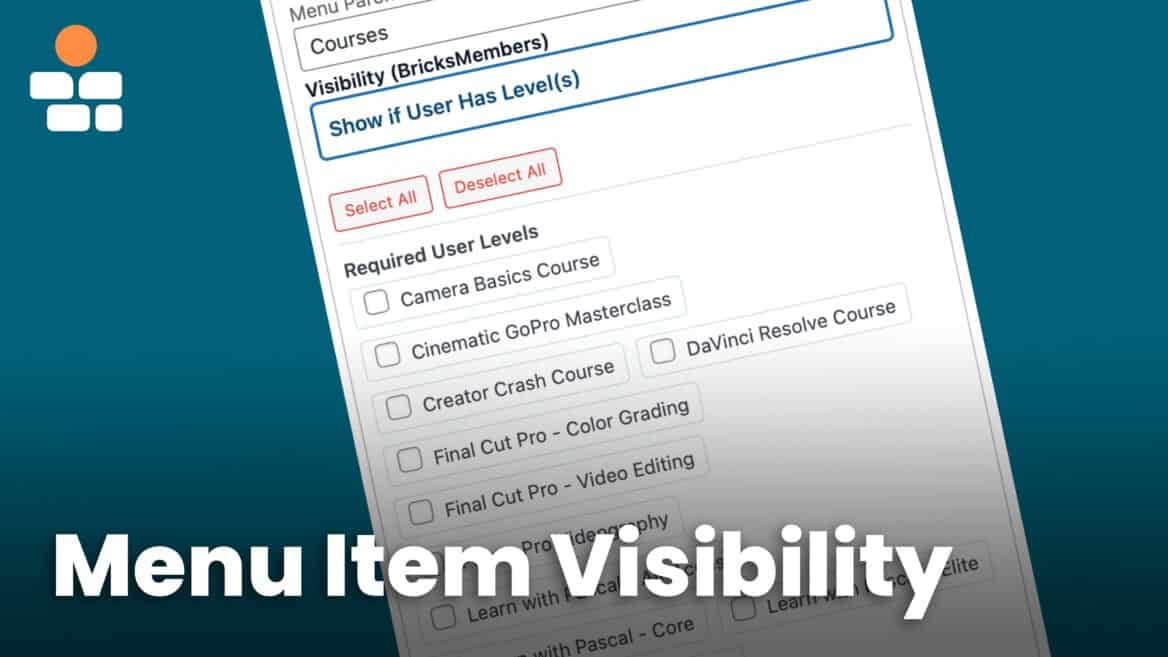
Rule 4: Show if User Has Level(s)
Use case: Level-specific pages (Premium Resources, VIP Lounge).
Steps:
- Expand the menu item (e.g., “Premium Resources”)
- In the Visibility (BricksMembers) section:
- Visibility: Show if User Has Level(s)
- Required User Levels: Check “Premium Member”
- Click Save Menu
Result: Only users with the “Premium Member” level see this menu item.
Multiple levels: You can check multiple levels. The menu item shows if the user has any of the selected levels (OR logic).
Rule 5: Hide if User Has Level(s)
Use case: Hide upgrade prompts from users who already upgraded.
Steps:
- Expand the menu item (e.g., “Upgrade to Premium”)
- In the Visibility (BricksMembers) section:
- Visibility: Hide if User Has Level(s)
- Required User Levels: Check “Premium Member”
- Click Save Menu
Result: Users with “Premium Member” don’t see this menu item. Everyone else does.
Part 4: Creating Member-Specific Menus
Let’s build a complete navigation system with different menus for different users.
Example 1: Main Navigation Menu
Goal: Show different links based on login status.
Steps:
- Go to Appearance → Menus
- Create a new menu: “Main Navigation”
- Add pages: Home, Courses, About, Login, Sign Up, Dashboard, My Courses, Logout
- Set visibility for each:
- Home: Always Show
- Courses: Always Show
- About: Always Show
- Login: Show if Logged Out
- Sign Up: Show if Logged Out
- Dashboard: Show if Logged In
- My Courses: Show if Logged In
- Logout: Show if Logged In
- Click Save Menu
- Assign the menu to your theme’s primary location
Result:
- Logged-out visitors see: Home, Courses, About, Login, Sign Up
- Logged-in members see: Home, Courses, About, Dashboard, My Courses, Logout
Example 2: Member Dashboard Menu
Goal: Show different dashboard sections based on membership level.
Steps:
- Create a new menu: “Dashboard Menu”
- Add menu items and set visibility:
- My Courses: Show if Logged In
- Free Resources: Show if User Has Level(s) → “Free Member”
- Premium Resources: Show if User Has Level(s) → “Premium Member”
- VIP Lounge: Show if User Has Level(s) → “VIP Member”
- Upgrade to Premium: Hide if User Has Level(s) → “Premium Member”, “VIP Member”
- Account Settings: Show if Logged In
- Click Save Menu
- Use this menu in your dashboard template (Bricks Builder → Nav Menu element)
Result:
- Free members see: My Dashboard, My Courses, Free Resources, Upgrade to Premium, Account Settings
- Premium members see: My Dashboard, My Courses, Free Resources, Premium Resources, Account Settings
- VIP members see: My Dashboard, My Courses, Free Resources, Premium Resources, VIP Lounge, Account Settings
Example 3: Course Platform Navigation
Goal: Show different course-related links based on user level.
Steps:
- Create a new menu: “Course Navigation”
- Add menu items and set visibility:
- Course Overview: Show if User Has Level(s) → “WordPress Basics”
- Beginner Lessons: Show if User Has Level(s) → “WordPress Basics”
- Advanced Lessons: Show if User Has Level(s) → “WordPress Advanced”
- Downloads: Show if User Has Level(s) → “WordPress Basics”, “WordPress Advanced”
- Click Save Menu
- Use this menu in your course template
Result: Students see only the content sections they have access to.
Part 5: Advanced Techniques
Technique 1: Nested Menus with Visibility
You can set different visibility rules for parent and child menu items.
Example:
- Parent: “Resources” (Always Show)
- Child: “Free Downloads” (Always Show)
- Child: “Premium Downloads” (Show if User Has Level(s) → Premium Member)
- Child: “VIP Downloads” (Show if User Has Level(s) → VIP Member)
Result:
- Everyone sees “Resources” in the menu
- When clicked, they see only the downloads they have access to
Steps:
- Add “Resources” as a custom link or page
- Add child pages: “Free Downloads”, “Premium Downloads”, “VIP Downloads”
- Drag each child item slightly to the right to make them children of “Resources”
- Set visibility for each child item as shown above
- Click Save Menu
Technique 2: Conditional Nav Menu Elements in Bricks
Use Bricks Builder’s Nav Menu element with conditions for complete control.
Steps:
- Edit your header template in Bricks
- Add a Nav Menu element
- Select your menu (e.g., “Public Menu”)
- Add condition: User Login → is → Logged Out
- Duplicate the Nav Menu element
- Select a different menu (e.g., “Member Menu”)
- Add condition: User Login → is → Logged In
- Style both elements identically
Result: The header shows completely different menus based on login status, with full Bricks styling control.
Part 6: Best Practices
Practice 1: Keep Menus Simple
Don’t overwhelm users with too many menu items.
- Bad: 15 menu items in the main navigation
- Good: 5-7 main items, with sub-menus for additional pages
Practice 2: Use Descriptive Labels
- Bad: “Resources”, “Stuff”, “More”
- Good: “Free Downloads”, “My Courses”, “VIP Lounge”
Why: Users know exactly what they’re clicking on.
Practice 3: Test with Different User Levels
After configuring visibility:
- Log out and check the menu
- Log in as a free member and check
- Log in as a premium member and check
- Log in as a VIP member and check
Verify: Each user sees the correct menu items.
Practice 4: Provide Clear Calls-to-Action
For logged-out users:
- “Sign Up” button in the menu
- “Login” link
- “Try Free” or “Get Started” links
For free members:
- “Upgrade to Premium” link (using “Hide if Has Level” to hide from Premium/VIP)
- “See Premium Features” link
Part 7: Common Issues and Solutions
Issue 1: Menu Items Not Hiding
Cause: Menu visibility module not enabled or cache not cleared.
Solution:
- Go to BricksMembers → Settings
- Verify Menu Visibility Control is enabled
- Clear your site cache (if using a caching plugin)
- Clear your browser cache
- Test in an incognito/private window
- If it’s a caching issue, change your cache settings and eval. deactivate certain caches – membership sites are difficult to cache!
Issue 2: All Menu Items Disappear
Cause: All items set to “Show if User Has Level(s)” but user has no levels.
Solution:
- Assign at least one level to the user (go to Users → All Users and edit the user)
- Or change some menu items to “Show if Logged In” instead
Issue 3: Menu Shows for Wrong Users
Cause: Visibility rule set incorrectly.
Solution:
- Go to Appearance → Menus
- Expand the menu item
- Double-check the Visibility setting
- Verify the Required User Levels are correct
- Click Save Menu
Issue 4: Child Menu Items Don’t Respect Parent Visibility
Behavior: Child items have independent visibility rules.
Understanding:
- Each menu item (parent or child) has its own visibility rule
- A child item will only show if BOTH the parent AND the child’s visibility rules are met
- To make children follow the parent’s rule, set children to “Always Show”
Summary
You’ve learned how to:
- ✅ Understand how menu visibility control works
- ✅ Enable the menu visibility module
- ✅ Set visibility rules for menu items (Always Show, Show if Logged In/Out, Show/Hide if User Has Level(s))
- ✅ Create member-specific navigation menus
- ✅ Use advanced techniques (nested menus, multiple menus, conditional Nav Menu elements)
- ✅ Follow best practices for menu organization
- ✅ Troubleshoot common visibility issues
Your site now provides a personalized navigation experience for every visitor!
