
This is the recommended way to protect content in BricksMembers.
Instead of redirecting users to another page, you use Bricks conditional logic to show different content to different users. This gives you complete creative control and a much better user experience.
This guide covers all the BricksMembers conditions and how to use them effectively.
What Is Conditional Logic?
Conditional logic means showing or hiding elements based on conditions.
Example:
- Show lesson content only to Premium members
- Show “Upgrade to Premium” message to non-Premium members
- Show “Completed!” badge only if the user finished the lesson
- Show different navigation for different membership levels
- Mix accessible and restricted content on the same page
In Bricks, you add conditions to any element. If the condition is met, the element shows. If not, it’s hidden.
Why this is better than redirects:
- Users stay on the page they’re trying to access
- You can show custom upgrade messages with CTAs
- You can tease content (show descriptions, hide videos)
- You can mix accessible and restricted content on one page
- Much better user experience and conversion rates
BricksMembers Conditions
BricksMembers adds several condition types to Bricks:
- User Level Match
- Has Access To
- Progress (when enabled)
- Drip (when enabled)
- Drip Next Post (when Drip Content is enabled)
- Post Liked (when Like System is enabled)
- Like Count (when Like System is enabled)
1. User Level Match
What it checks: Does the user have the required level(s) for the current post?
Options:
- Yes – User has at least one required level
- Yes + Empty – User has at least one required level OR post has no required levels
- No – User doesn’t have any required levels
- No + Empty – User doesn’t have required levels OR post has no required levels
Use cases:
- Show content only to users with access
- Show “Upgrade” message to users without access
- Show different content based on access
Example: Show Upgrade Message
- Go to Bricks → Templates and edit your post template
- Add a Section element
- Set condition: BricksMembers → User Level Match → No
- Inside the section, add: “Upgrade to Premium to access this content”
- Add a button linking to your pricing page
Now users without access see the upgrade message instead of the content.
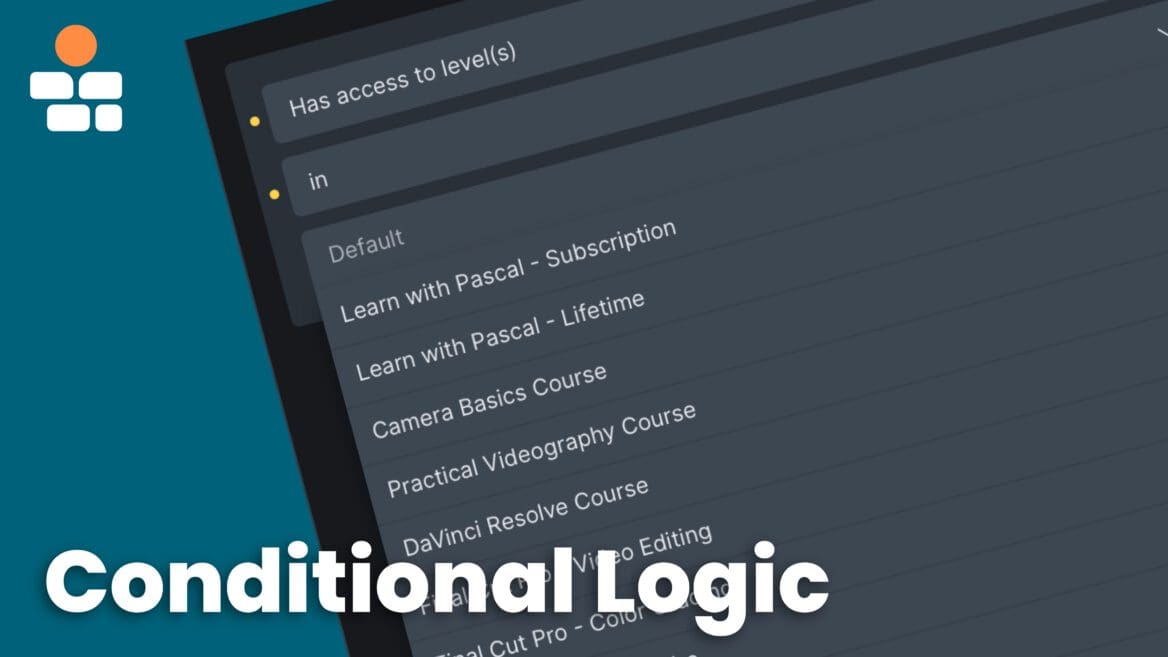
2. Has Access To
What it checks: Does the user have specific level(s)?
This is basically another way of restricting content based on user levels, but without having to assign the required level(s) to posts. So you can also dynamically show or hide content based on user levels that have nothing to do with the current post. For example, to advertise other courses.
Options:
- In – User has at least one selected level
- Not In – User doesn’t have any selected levels
- Select one or more levels
Use cases:
- Show content only to Premium members
- Show different navigation for different levels
- Show special tools only to specific membership levels
Example: Advertise courses outside of the current scope
- Go to Bricks → Templates and edit your post template
- Add a Section element or a div for a sidebar.
- Set condition: BricksMembers → Has Access To → Not In → “How to Pet Your Cat Course”
- Inside the section, advertise your “How to Pet Your Cat Course”.
Only users that did not buy this course yet, will see the ad – great for upsells!
3. Progress: Completion Filter
What it checks: Is the current post completed by the user?
Options:
- Completed – User has marked this post complete
- Not Completed – User hasn’t marked this post complete
Use cases:
- Show “Completed!” badge on finished lessons
- Show “Mark as complete” button only on incomplete lessons
- Show different navigation based on completion
Example: Completion Badge
- Go to Bricks → Templates and edit your post template
- Add a Text element: “✓ Completed!”
- Set condition: BricksMembers → Progress → Completed
- Style it (green background, white text)
The badge only shows on completed posts.
4. Drip: Unlock Status
What it checks: Is the current post unlocked for the user?
Options:
- Unlocked – Post is unlocked (user can access it)
- Locked – Post is locked (user can’t access it yet)
- Time Ready – Time-based conditions are met (delay, cohort, cadence)
- Time Not Ready – Time-based conditions are not yet met
- Prerequisites Ready – Prerequisite conditions are met (previous items completed)
- Prerequisites Not Ready – Prerequisite conditions are not yet met
Use cases:
- Show lesson content only if unlocked
- Show “Unlocks on [date]” message if locked
- Show different CTAs based on unlock status
Example: Locked Message
- Go to Bricks → Templates and edit your post template
- Add a Section element
- Set condition: BricksMembers → Drip → Locked
- Inside, add: “This lesson unlocks on {brm_drip:unlock_date}”
Users see when the lesson will unlock.
5. Drip Next Post
What it checks: Is the next post in the sequence unlocked, locked, or does it not exist? Use this when you want to show different UI based on whether the user can proceed to the next lesson.
Note: Requires Drip Content module enabled.
Scope options: Define where “next” is searched:
- Parent Level – Next post within the same parent (e.g., next lesson in the module)
- Top Level – Next post within the top-level post (e.g., next lesson in the course)
- Structure – Next post across the entire structure
- Current Level – Next post at the same structure level
Value options:
- Unlocked – Next post exists and is unlocked for the user
- Locked – Next post exists but is still locked
- No Next Post – There is no next post (user is on the last item)
Use cases:
- Show “Continue to next lesson” button only when the next lesson is unlocked
- Show “Complete current lesson to unlock” when next exists but is locked
- Show “You’ve completed this module!” when there is no next post
6. Post Liked
What it checks: Has the current user liked this post?
Note: This condition is only available when the Like System is enabled in BricksMembers settings.
Options:
- Liked – User has liked this post
- Not Liked – User hasn’t liked this post
Use cases:
- Show “You liked this!” message on liked posts
- Show like button only if not already liked
- Show different content based on like status
Example: Liked Indicator
- Go to Bricks → Templates and edit your post template
- Add a Text element: “❤️ You liked this!”
- Set condition: BricksMembers → Post Liked → Liked
- Style it (red text, heart icon)
The indicator only shows when the user has liked the post.
7. Like Count
What it checks: How many total likes does this post have?
Note: This condition is only available when the Like System is enabled in BricksMembers settings.
Options:
- Is at least – Post has at least X likes
- Is at most – Post has at most X likes
- Is exactly – Post has exactly X likes
- Is greater than – Post has more than X likes
- Is less than – Post has fewer than X likes
Use cases:
- Show “Popular!” badge on posts with 10+ likes
- Show “Trending” message on highly-liked content
- Highlight popular lessons in course catalogs
Example: Popular Badge
- Go to Bricks → Templates and edit your post template
- Add a Text element: “🔥 Popular!”
- Set condition: BricksMembers → Like Count → Is at least → 10
- Style it (orange background, white text)
The badge only shows on posts with 10 or more likes.
Combining Conditions
You can combine multiple conditions with AND/OR logic.
AND Logic (All conditions must be met)
Example: Show content only to Premium members who have completed the previous lesson.
- Go to Bricks → Templates and edit your post template
- Add a Section element
- Add condition 1: BricksMembers → Has Access To → Premium Member → Match
- Add condition 2: BricksMembers → Progress → Completed (on previous lesson post ID)
- Set logic: AND
Both conditions must be true for the section to show.
OR Logic (Any condition can be met)
Example: Show content to either Pro OR Premium members.
- Go to Bricks → Templates and edit your lesson post template
- Add a Section element for your lesson content
- Add condition 1: BricksMembers → User Level Match → Pro Member
- Add condition 2: BricksMembers → Drip → Is → Unlocked
- Set logic: OR
If the user has the Pro Member user level, he will see the content instantly. If not, he has to wait until it’s unlocked via drip.
Real-World Examples
Example 1: Free Preview + Premium Full Content
Goal: Show a preview to everyone, full content only to Premium members.
Setup:
Full Content Section
- Condition: User Level Match → Is → Yes
- Add full lesson content
Preview + Upgrade CTA Section
- Condition: User Level Match → Is → No
- Add preview & “Upgrade to Premium” button
Result:
- Everyone sees the preview and upgrade CTA
- Premium members see the full content
Example 2: Locked Lesson with Unlock Date
Goal: Show lesson content if unlocked, show unlock date if locked.
Setup:
Unlocked Content Section
- Condition: Drip → Unlocked
- Add lesson content
Locked Message Section
- Condition: Drip → Locked
- Add: “This lesson unlocks on {brm_drip:unlock_date}”
- Add: “Complete the previous lesson to unlock it sooner”
Result:
- Unlocked users see the content
- Locked users see when it unlocks
Example 3: Different Navigation for Different Levels
Goal: Show different menu items based on membership level.
Setup:
Free Member Menu Item
- Condition: Has Access To → Free Member
- Link: “Free Courses”
Premium Member Menu Item
- Condition: Has Access To → Premium Member
- Link: “Premium Courses”
Upgrade Menu Item
- Condition: Has Access To → Premium Member
- Link: “Upgrade to Premium”
Result:
- Free members see “Free Courses” and “Upgrade”
- Premium members see “Premium Courses”
Example 4: Progress-Based Content
Goal: Show a congratulations message when users complete a lesson.
Setup:
- Go to Bricks → Templates and edit your post template
- Add a Section element
- Add condition: BricksMembers → Progress → Completed
- Inside, add: “🎉 Congratulations! You’ve completed this lesson!”
Result:
- Message shows only when the current lesson is completed
Example 5: VIP-Only Tools
Goal: Show special tools only to users with VIP level.
Setup:
- Go to Bricks → Templates and edit your post template
- Add a Section element
- Add condition: BricksMembers → Has Access To → VIP Member
- Inside, add VIP tools (coaching, priority support, etc.)
Result:
- Only VIP members see the tools
- Regular members don’t see anything
Query Loop Filters
BricksMembers also adds filters to Bricks query loops, which work quite similar to conditions. Check our Query Loop Filter Guide for more information.
Best Practices
- Test conditions with different user accounts / user levels applied
- Provide Fallbacks
- Show a message when content is hidden (“Upgrade to access”)
- Provide alternative content for users without access
- Explain why content is hidden
Use Appropriate Conditions
Do:
- Use “Has Access To” for static level-based content
- Use “User Level Match” for post-specific access
Don’t:
- Use “User Level Match” when you mean “Has Access To”
- Mix up completion and unlock status
Common Questions
Q: Can I use conditions on any Bricks element?
A: Yes! Conditions work on all Bricks elements (sections, containers, text, images, buttons, etc.).
Q: Can I use multiple BricksMembers conditions on one element?
A: Yes! Combine as many as you need with AND/OR logic.
Q: Can I use BricksMembers conditions with other Bricks conditions?
A: Yes! Mix BricksMembers conditions with user role conditions, date conditions, etc.
Q: What happens if a condition is false?
A: The element is completely hidden (not just visually hidden—it’s not rendered at all).
Q: Can I use conditions in Bricks templates?
A: Yes! Conditions work in templates and are evaluated for each post using the template.
Q: Can I invert a condition (e.g., “NOT completed”)?
A: Yes! Use the “No Match” or “Not Completed” options, or use Bricks’ condition inversion.
Q: Do conditions affect SEO?
A: Hidden content is not rendered in the HTML, so search engines don’t see it. This is usually fine for member-only content. If it should show up, use a condition on a non-important element together with css :has selector and display: none;
Q: Can I use conditions to show different content to different levels on the same page?
A: Yes! This is a common pattern (see Example 1 above).
Next Steps
Now that you understand conditional logic, you’re ready to:
- Build advanced member dashboards – Show personalized content
- Create dynamic course pages – Different content for different users


